Developer Guide
About ClassMonitor
ClassMonitor is a Student Management System that empowers TAs and Professors to manage their student particulars and obtain insights about their students’ performance ratings. As a TA, you can easily view and edit your students’ particulars during your daily classes. Utilize ClassMonitor’s flexible tagging system to help you organize your students according to their modules and classes. Finally, streamline your performance grading decisions by deriving insights from your students’ performance indicators across time, through ClassMonitor’s statistics – you can allocate stars to students for good class participation and bolts for absenteeism!
The Developer Guide offers comprehensive documentation on the design and implementation of ClassMonitor. It includes details on the architecture of ClassMonitor, specifications for individual components, and an overview of the software’s functionality and operations.
Table of Contents
- About ClassMonitor
- Table of Contents
- Acknowledgements
- Setting up, getting started
- Design
- Implementation
- Documentation, logging, testing, configuration, dev-ops
- Appendix: Requirements
- Appendix: Planned Enhancements
- Appendix: Instructions for manual testing
- Glossary
Acknowledgements
ClassMonitor is a brownfield software project based off AddressBook Level-3, taken under the CS2103T Software Engineering module held by the School of Computing at the National University of Singapore.
Java dependencies:
Documentation dependencies:
Fonts used in ClassMonitor:
- ClassMonitor Website:
- Epilogue by Tyler Finck
- Source Code Pro by Paul D. Hunt
Other acknowledgments:
- Material Design Icons:
- star by Sketchify on Canva as ClassMonitor’s App Icon
- Font Awesome 6 icons:
- book as the “note” admonition icon
- circle-info as the “info” admonition icon
- fire-flame-curved as the “danger” admonition icon
- lightbulb as the “tip” admonition icon
- triangle-exclamation as the “warning” admonition icon
- Code acknowledgements:
- Website Layout adapted from AY2223S1-CS2103T-W16-2’s tP Project
- Custom link fragment checker adapted from the World Wide Web Consortium
- Pure CSS auto-incrementing heading counters adapted from @gvgramazio on StackOverflow
- PDF styling of HTML pages following Michael Perrin’s tutorial
- Pure liquid admonitions adapted from @kimkyunghwan21 on GitHub
- Pure liquid HTML table-of-contents from @allejo on GitHub
- Miscellaneous:
- Docusaurus for admonition colors and styling
- SchemeColor for admonition colors
Setting up, getting started
Refer to the guide Setting up and getting started.
Design
TIP
The .puml files used to create the diagrams in this document are in the docs/diagrams folder. Refer to the PlantUML Tutorial at se-edu/guides to learn how to create and edit diagrams.
Architecture

The Architecture Diagram given above explains the high-level design of the App.
Given below is a quick overview of the main components and how they interact with each other.
Main components of the architecture
Main (consisting of classes Main and MainApp) is in charge of the app launch and shut down.
- At app launch, it initializes the other components in the correct sequence, and connects them up with each other.
- At shut down, it shuts down the other components and invokes cleanup methods where necessary.
The bulk of the app’s work is done by the following four components:
UI: The UI of the App.Logic: The command executor.Model: Holds the data of the App in memory.Storage: Reads data from, and writes data to, the hard disk.
Commons represents a collection of classes used by multiple other components.
How the architecture components interact with each other
The Sequence Diagram below shows how the components interact with each other for the scenario where the user issues the command delete 1.

Each of the four main components (also shown in the diagram above),
- defines its API in an
interfacewith the same name as the Component. - implements its functionality using a concrete
{Component Name}Managerclass (which follows the corresponding APIinterfacementioned in the previous point).
For example, the Logic component defines its API in the Logic.java interface and implements its functionality using the LogicManager.java class which follows the Logic interface. Other components interact with a given component through its interface rather than the concrete class (reason: to prevent outside components from being coupled to the implementation of a component), as illustrated in the (partial) class diagram below.

The sections below give more details of each component.
UI component
The API of this component is specified in Ui.java

The UI consists of a MainWindow that is made up of parts e.g.CommandBox, ResultDisplay, StudentListPanel, StatusBarFooter etc. All these, including the MainWindow, inherit from the abstract UiPart class which captures the commonalities between classes that represent parts of the visible GUI.
The UI component uses the JavaFx UI framework. The layout of these UI parts are defined in matching .fxml files that are in the src/main/resources/view folder. For example, the layout of the MainWindow is specified in MainWindow.fxml
The UI component,
- executes user commands using the
Logiccomponent. - listens for changes to
Modeldata so that the UI can be updated with the modified data. - keeps a reference to the
Logiccomponent, because theUIrelies on theLogicto execute commands. - depends on some classes in the
Modelcomponent, as it displaysStudentobjects residing in theModel.
Logic component
API : Logic.java
Here’s a (partial) class diagram of the Logic component:

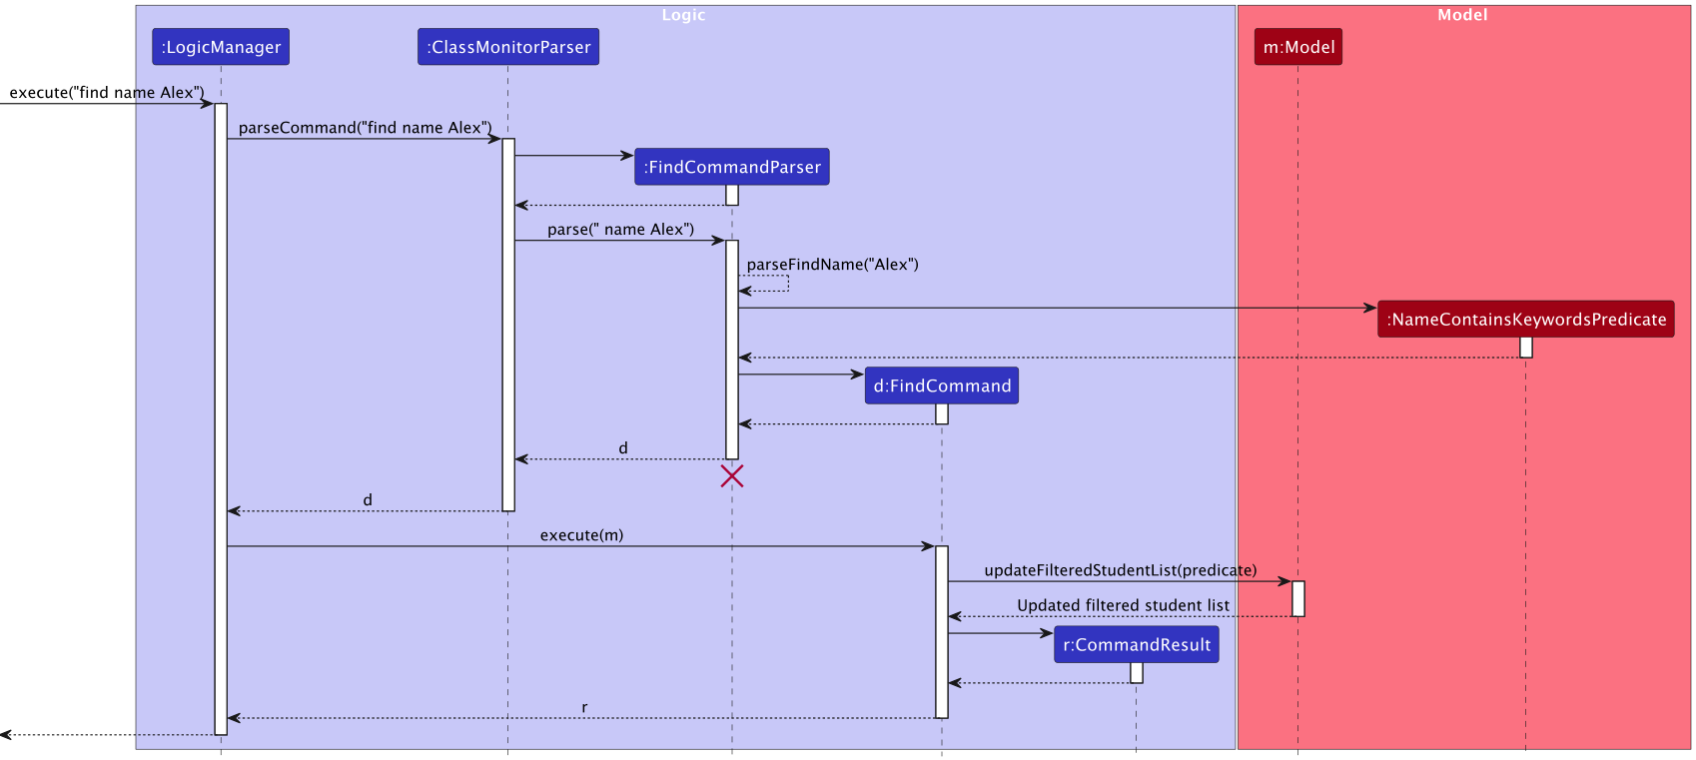
The sequence diagram below illustrates the interactions within the Logic component, taking execute("find name Alex") API call as an example.
NOTE
The lifeline for FindCommandParser should end at the destroy marker (X) but due to a limitation of PlantUML, the lifeline continues till the end of diagram.
How the Logic component works:
- When
Logicis called upon to execute a command, it is passed toClassMonitorParserobject which in turn creates a parser that matches the command (e.g.,FindCommandParser) and uses it to parse the command. - This results in a
Commandobject (more precisely, an object of one of its subclasses e.g.,FindCommand) which is executed by theLogicManager. - The command can communicate with the
Modelwhen it is executed (e.g. to return students with names that match the specified keyword).
Note that although this is shown as a single step in the diagram above (for simplicity), in the code it can take several interactions (between the command object and theModel) to achieve. - The result of the command execution is encapsulated as a
CommandResultobject which is returned back fromLogic.
Here are the other classes in Logic (omitted from the class diagram above) that are used for parsing a user command:

How the parsing works:
- When called upon to parse a user command, the
ClassMonitorParserclass creates anXYZCommandParser(XYZis a placeholder for the specific command name e.g.,AddCommandParser) which uses the other classes shown above to parse the user command and create aXYZCommandobject (e.g.,AddCommand) which theClassMonitorParserreturns back as aCommandobject. - All
XYZCommandParserclasses (e.g.,AddCommandParser,DeleteCommandParser, …) inherit from theParserinterface so that they can be treated similarly where possible e.g, during testing.
Model component
API : Model.java

The Model component,
- stores ClassMonitor data i.e., all
Studentobjects (which are contained in aUniqueStudentListobject). - stores the currently ‘selected’
Studentobjects (e.g., results of a search query) as a separate filtered list which is exposed to outsiders as an unmodifiableObservableList<Student>that can be ‘observed’ e.g. the UI can be bound to this list so that the UI automatically updates when the data in the list change. - stores a
UserPrefobject that represents the user’s preferences. This is exposed to the outside as aReadOnlyUserPrefobjects. - does not depend on any of the other three components (as the
Modelrepresents data entities of the domain, they should make sense on their own without depending on other components)
NOTE
An alternative (arguably, a more OOP) model is given below. It has a Tag list in the ClassMonitor, which Student references. This allows ClassMonitor to only require one Tag object per unique tag, instead of each Student needing their own Tag objects.

Storage component
API : Storage.java

The Storage component,
- can save both ClassMonitor data and user preference data in JSON format, and read them back into corresponding objects.
- inherits from both
ClassMonitorStorageandUserPrefStorage, which means it can be treated as either one (if only the functionality of only one is needed). - depends on some classes in the
Modelcomponent (because theStoragecomponent’s job is to save/retrieve objects that belong to theModel)
Common classes
Classes used by multiple components are in the seedu.address.commons package.
Implementation
This section describes some noteworthy details on how certain features are implemented.
Awarding Stars to a Student
Overview
The star mechanism is facilitated by StarCommand, which is called by its execute method to add stars to a Student.
StarCommandParser#parse()— Parses the parameters of the star command from its command-line String input.StarCommand#execute()— Updates theClassMonitorwith the added stars.
Feature Details
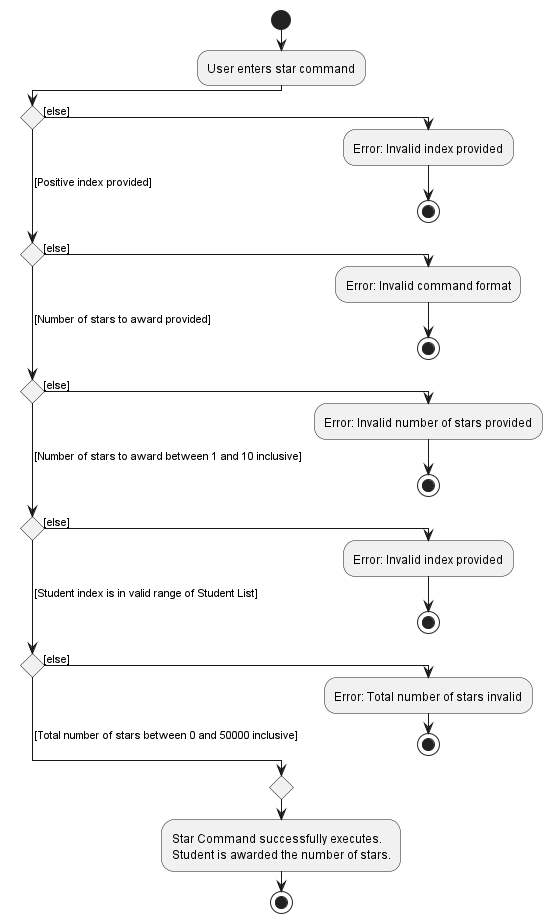
Here is the activity diagram showing the process of the star command:
Here is the sequence diagram showing how a star operation goes through the Logic, Model and Storage components.
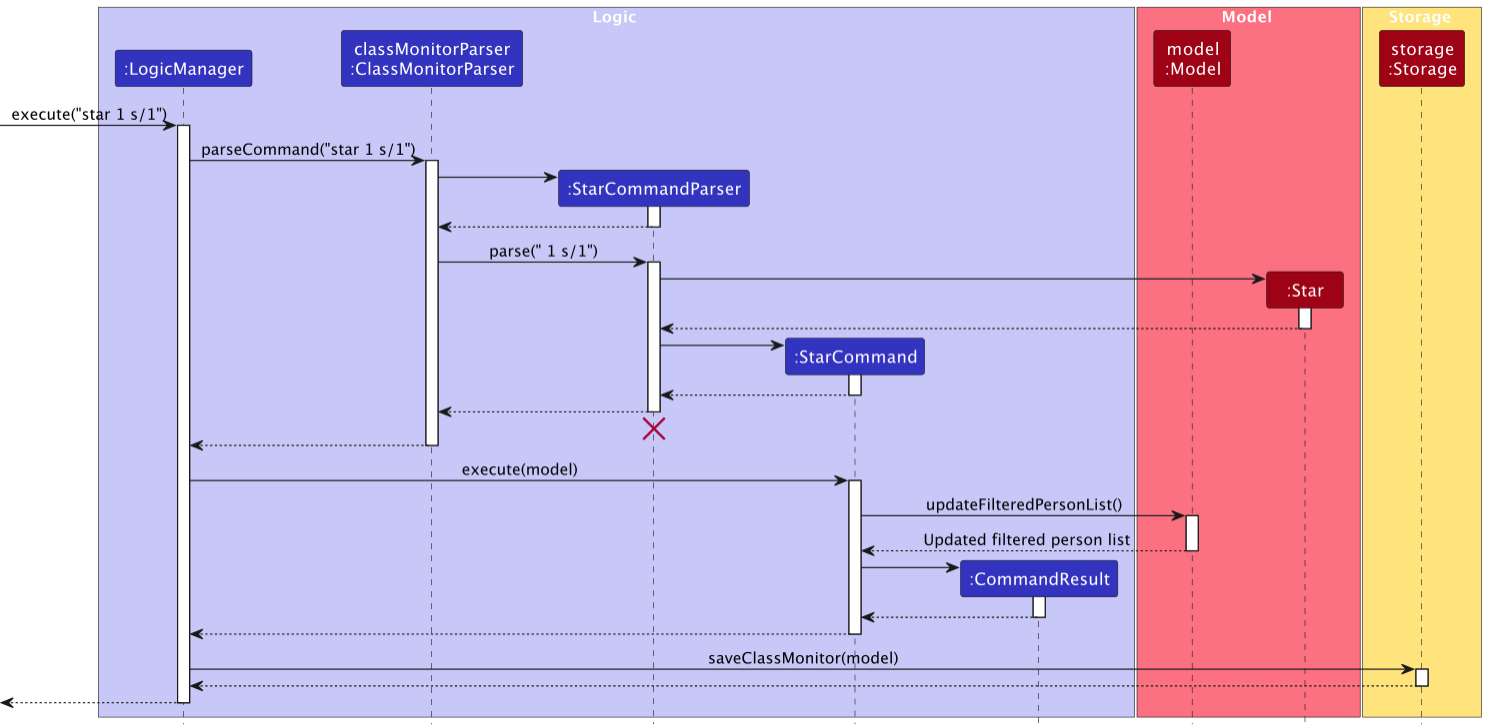
Step 1. The user enters in command: star 1 s/2.
Step 2. The LogicManager calls on ClassMonitorParser to parse the String.
Step 3. The ClassMonitorParser calls StarCommandParser.parse(), which returns a StarCommand.
NOTE
If the number of stars is non-positive (i.e. < 1), then it will raise a parse exception.
Step 4. LogicManager calls on StarCommand.execute(), which updates the ClassMonitor with the new number of stars.
Design considerations:
Aspect: How star executes:
- Method 1: Increments the number of stars using
Starcommand.- Pros: Easy to implement, easy to use.
- Cons: Does not allow user to edit the number of stars.
- Method 2: Updates the number of stars using
Editcommand.- Pros: Able to edit the number of stars however one desires.
- Cons: Command is not modularised, user have to calculate the number of stars themselves when updating.
Awarding Bolts to a Student
Overview
The bolt mechanism is facilitated by BoltCommand, which is called by its execute method to add bolts to a Student.
BoltCommandParser#parse()— Parses the parameters of the bolt command from its command-line String input.BoltCommand#execute()— Updates theClassMonitorwith the added bolts.
Feature Details
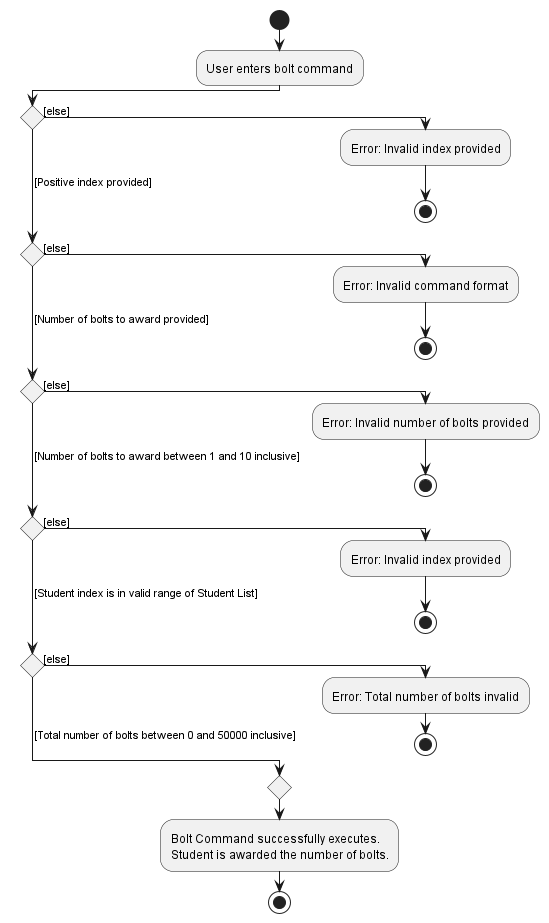
Here is the activity diagram showing the process of the bolt command:
Here is the sequence diagram showing how a bolt operation goes through the Logic, Model and Storage components.
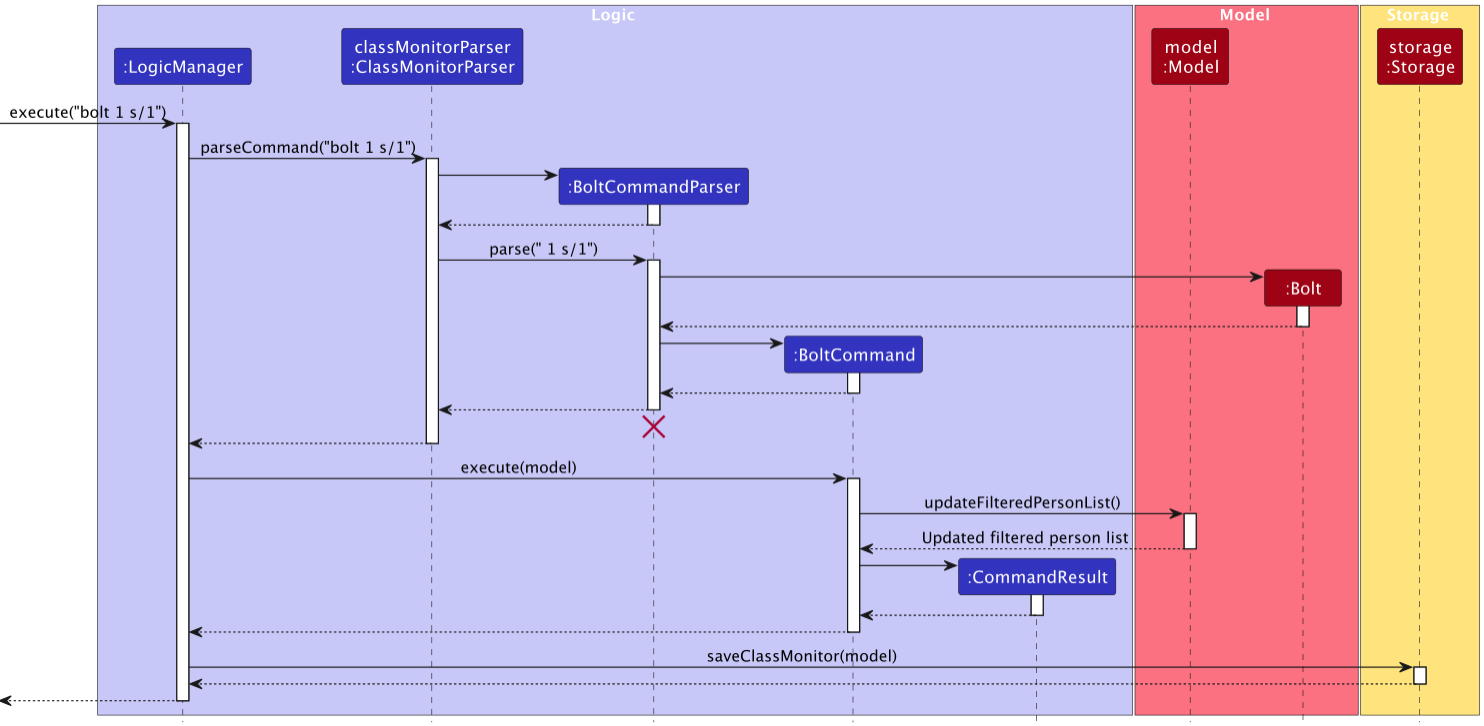
Step 1. The user enters in command: bolt 1 b/2.
Step 2. The LogicManager calls on ClassMonitorParser to parse the String.
Step 3. The ClassMonitorParser calls BoltCommandParser.parse(), which returns a BoltCommand.
NOTE
If the number of bolts is non-positive (i.e. < 1), then it will raise a parse exception.
Step 4. LogicManager calls on BoltCommand.execute(), which updates the ClassMonitor with the new number of bolts.
Design considerations:
Aspect: How bolt executes:
- Method 1: Increments the number of bolts using
Boltcommand.- Pros: Easy to implement, easy to use.
- Cons: Does not allow user to edit the number of bolts.
- Method 2: Updates the number of bolts using
Editcommand.- Pros: Able to edit the number of bolts however one desires.
- Cons: Command is not modularised, user have to calculate the number of bolts themselves when updating.
Sorting Students
Overview
The sorting mechanism is facilitated by SortCommand, which is called by its execute method to sort the students
based on one of its fields either in ascending or descending order
SortCommandParser#parse()— Parses the parameters of the sort command from its command-line String input.SortCommand#execute()— Updates the ClassMonitor to display the sorted list.
Feature Details
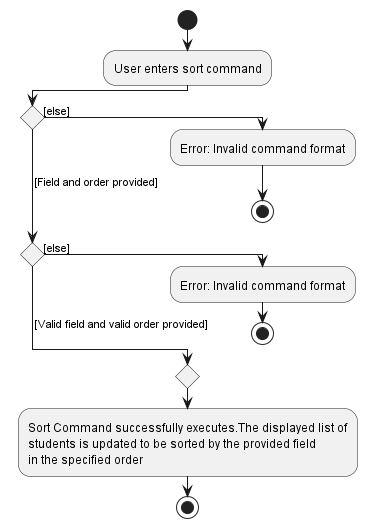
Here is the activity diagram showing the process of the sort command:
Here is the sequence diagram showing how a sort operation goes through the Logic, Model and Storage components.
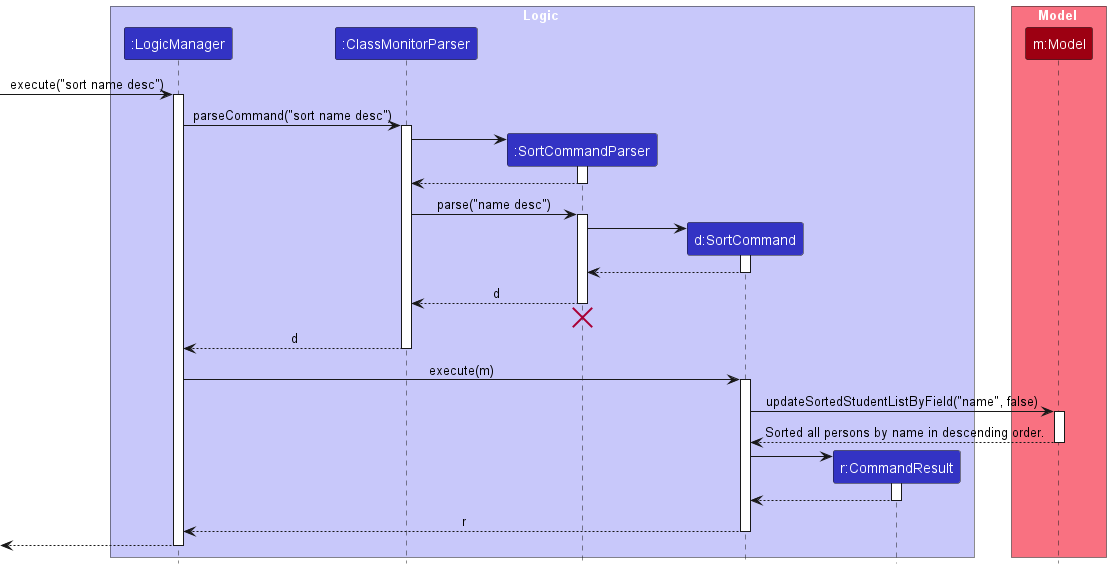
Step 1. The user enters in command: sort name desc.
Step 2. The LogicManager calls on ClassMonitorParser to parse the String.
Step 3. The ClassMonitorParser calls SortCommandParser.parse(), which returns a SortCommand.
NOTE
If either the field field or sorting order isAscending is not provided, a parse error will be thrown.
Step 4. LogicManager calls on SortCommand.execute(), which updates the classmonitor with the new sorted list.
Finding Students
Overview
The find mechanism is facilitated by FindCommand, which is called by its execute method to filter the students
based on one of its fields and a given criteria
FindCommandParser#parse()— Parses the parameters of the find command from its command-line String input.FindCommand#execute()— Updates the ClassMonitor to display the filtered list.
Feature Details
Here is the activity diagram showing the process of the Find command:

Here is the sequence diagram showing how a find operation goes through the Logic, Model and Storage components.

Step 1. The user specifies the field and criteria to find students by, and enters in command: find field criteria (e.g. find name Alex).
Step 2. The LogicManager calls on ClassMonitorParser to parse the String.
Step 3. The ClassMonitorParser calls FindCommandParser.parse(), which then calls the parser for the specified field (e.g. FindCommandParser.parseFindName()), which returns a FindCommand.
NOTE
If the field or criteria specified is invalid, a parse error will be raised.
Step 4. LogicManager calls on FindCommand.execute(), which updates the student list with the new filtered list.
[Proposed] Undo/redo feature
Proposed Implementation
The proposed undo/redo mechanism is facilitated by VersionedClassMonitor. It extends ClassMonitor with an undo/redo history, stored internally as an classMonitorStateList and currentStatePointer. Additionally, it implements the following operations:
VersionedClassMonitor#commit()— Saves the current ClassMonitor state in its history.VersionedClassMonitor#undo()— Restores the previous ClassMonitor state from its history.VersionedClassMonitor#redo()— Restores a previously undone ClassMonitor state from its history.
These operations are exposed in the Model interface as Model#commitClassMonitor(), Model#undoClassMonitor() and Model#redoClassMonitor() respectively.
Given below is an example usage scenario and how the undo/redo mechanism behaves at each step.
Step 1. The user launches the application for the first time. The VersionedClassMonitor will be initialized with the initial ClassMonitor state, and the currentStatePointer pointing to that single ClassMonitor state.

Step 2. The user executes delete 5 command to delete the 5th student in ClassMonitor. The delete command calls Model#commitClassMonitor(), causing the modified state of ClassMonitor after the delete 5 command executes to be saved in the classMonitorStateList, and the currentStatePointer is shifted to the newly inserted ClassMonitor state.

Step 3. The user executes add n/David … to add a new student. The add command also calls Model#commitClassMonitor(), causing another modified ClassMonitor state to be saved into the classMonitorStateList.

NOTE
The Developer Guide offers comprehensive documentation on the design and implementation of ClassMonitor. It includes details on the architecture of ClassMonitor, specifications for individual components, and an overview of the software’s functionality and operation.If a command fails its execution, it will not call Model#commitClassMonitor(), so ClassMonitor state will not be saved into the classMonitorStateList.
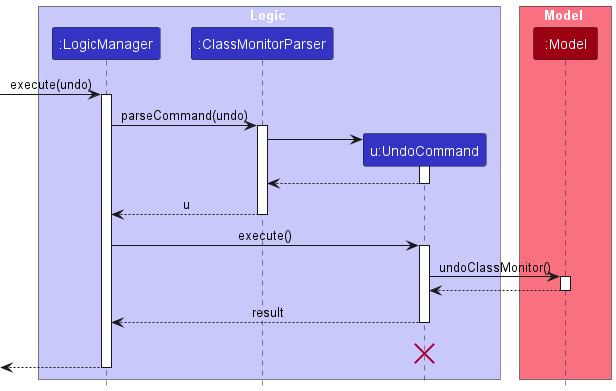
Step 4. The user now decides that adding the student was a mistake, and decides to undo that action by executing the undo command. The undo command will call Model#undoClassMonitor(), which will shift the currentStatePointer once to the left, pointing it to the previous ClassMonitor state, and restores ClassMonitor to that state.

NOTE
If the currentStatePointer is at index 0, pointing to the initial ClassMonitor state, then there are no previous ClassMonitor states to restore. The undo command uses Model#canUndoClassMonitor() to check if this is the case. If so, it will return an error to the user rather than attempting to perform the undo.
The following sequence diagram shows how an undo operation goes through the Logic component:
NOTE
The lifeline for UndoCommand should end at the destroy marker (X) but due to a limitation of PlantUML, the lifeline reaches the end of diagram.
Similarly, how an undo operation goes through the Model component is shown below:
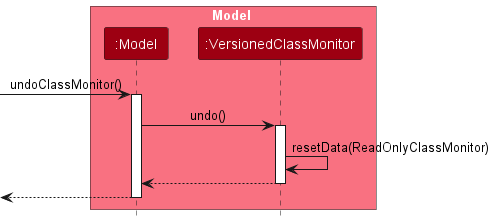
The redo command does the opposite — it calls Model#redoClassMonitor(), which shifts the currentStatePointer once to the right, pointing to the previously undone state, and restores ClassMonitor to that state.
NOTE
If the currentStatePointer is at index classMonitorStateList.size() - 1, pointing to the latest ClassMonitor state, then there are no undone ClassMonitor states to restore. The redo command uses Model#canRedoClassMonitor() to check if this is the case. If so, it will return an error to the user rather than attempting to perform the redo.
Step 5. The user then decides to execute the command list. Commands that do not modify ClassMonitor, such as list, will usually not call Model#commitClassMonitor(), Model#undoClassMonitor() or Model#redoClassMonitor(). Thus, the classMonitorStateList remains unchanged.

Step 6. The user executes clear, which calls Model#commitClassMonitor(). Since the currentStatePointer is not pointing at the end of the classMonitorStateList, all ClassMonitor states after the currentStatePointer will be purged. Reason: It no longer makes sense to redo the add n/David … command. This is the behavior that most modern desktop applications follow.

The following activity diagram summarizes what happens when a user executes a new command:

Design considerations:
Aspect: How undo & redo executes:
- Alternative 1 (current choice): Saves the entire ClassMonitor.
- Pros: Easy to implement.
- Cons: May have performance issues in terms of memory usage.
- Alternative 2: Individual command knows how to undo/redo by
itself.
- Pros: Will use less memory (e.g. for
delete, just save the student being deleted). - Cons: We must ensure that the implementation of each individual command are correct.
- Pros: Will use less memory (e.g. for
{more aspects and alternatives to be added}
[Proposed] Data archiving
{Explain here how the data archiving feature will be implemented}
[Proposed] Student Comments
Feature Proposal
This feature is an extension of the ‘Stars’ feature. When a TA gives a student stars, they can also leave a comment to explain why the Student received them. Each instance of a user giving stars (with optional comments) can be stored by Student.
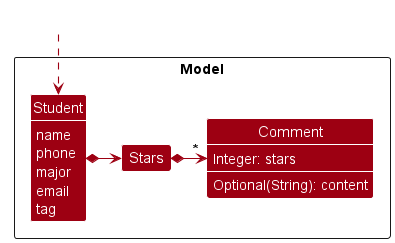 .
.
Command Format
Users will be able to add comments to a student by using the star command:
Usage: star INDEX s/STARS [c/COMMENT]
the edit command will also be extended to allow users to edit the comments.
Usage: edit INDEX ...c/INDEX2 COMMENT...
The command will edit the comment at the student with index INDEX with comment index INDEX2.
UI Modifications
Alternative 1
- Users will be able to view the comments they have left for each student in a separate window. The components of the window will track changes to the student comments in the model.
Alternative 2
- Users will be able to view the comments they have left for each student in a separate display in the same window.
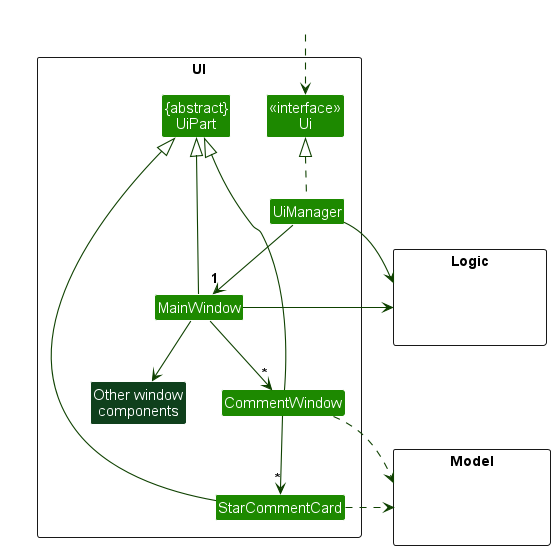 .
.
Documentation, logging, testing, configuration, dev-ops
Appendix: Requirements
Product scope
Target user profile:
- Teaching Assistant (TA) who is responsible for managing classes of students
- Has a need to track class participation across students
- prefers desktop apps on a laptop
- prefers typing in a CLI interface to mouse interactions
Value proposition: ClassMonitor empowers TAs to manage their students and obtain insights from students’ data.
User stories
INFO
The following legend describes the symbols used in this section:
| Priority | Symbol | Meaning |
|---|---|---|
| High | * * * |
Must have |
| Medium | * * |
Nice to have |
| Low | * |
Unlikely to have |
| Priority | As a … | I want to … | So that I can… |
|---|---|---|---|
* * * |
TA using the App for the first time | see usage instructions | refer to instructions when I forget how to use the App |
* * * |
TA | add a new student | |
* * * |
TA | edit a student’s details | |
* * * |
TA | delete a student | remove entries that I no longer need |
* * * |
TA | know the majors of my students | understand their learning needs |
* * * |
TA | find a student by name | locate details of students without having to go through the entire list |
* * * |
TA | track a student’s participation | gauge their engagement in class |
* * * |
TA | track a student’s attendance | mark and record attendance efficiently |
* * * |
TA | tag the students by their TGs | remember which class my students are in |
* * * |
TA | tag the students by their modules | remember which module my students are in |
* * |
TA | filter the students by their TGs | view all the students from a TG |
* * |
TA | filter students by their modules | view all the students from a module |
* * |
TA | exit the program | |
* * |
TA | sort students based on participation | praise those who have taken initiative and remind those who have not to be more proactive |
* |
TA | have a personal description of the student | know more about them |
* |
TA | clear all students’ details | remove all entries quickly |
* |
TA with many students in ClassMonitor | sort students by name | locate a student easily |
Use cases
(For all use cases below, the System is the ClassMonitor and the Actor is the TA, unless specified otherwise)
Use case 1: Delete a student
MSS:
- TA requests to list students
- ClassMonitor shows a list of students
- TA requests to delete a specific student in the list
-
ClassMonitor deletes the student
Use case ends.
Extensions:
-
2a. The list is empty.
Use case ends.
-
3a. The given index is invalid.
-
3a1. ClassMonitor shows an error message.
Use case resumes at step 2.
-
Use case 2: Add a student
MSS:
- TA requests to add a student in the list
- TA includes the relevant student’s info
-
ClassMonitor adds the student
Use case ends.
Extensions:
- 2a. TA did not follow the correct format as stated in the instructions.
-
2a1. ClassMonitor shows an error message.
Use case ends.
Use case 3: Add a tag to a student
MSS:
- TA requests to list students
- ClassMonitor shows a list of students
- TA requests to add a tag to a specific student in the list
-
ClassMonitor adds the tag
Use case ends.
Extensions:
-
2a. The list is empty.
Use case ends.
-
3a. The given index is invalid.
-
3a1. ClassMonitor shows an error message.
Use case resumes at step 2.
-
Use case 4: Find a student by name
MSS:
- TA requests to list students
- ClassMonitor shows a list of students
- TA searches a specific student in the list
-
ClassMonitor returns the specific student’s details
Use case ends.
Extensions:
-
2a. The list is empty.
Use case ends.
-
3a. The given keyword does not match any student’s name.
-
3a1. ClassMonitor shows an error message.
Use case resumes at step 2.
-
Use case 5: Add a star/bolt to a student
MSS:
- TA requests to list students
- ClassMonitor shows a list of students
- TA adds a star/bolt to a specific student in the list
-
ClassMonitor adds a star/bolt to the student
Use case ends.
Extensions:
-
2a. The list is empty.
Use case ends.
Use case 6: Find students by a specific field
MSS:
- TA requests to list students
- ClassMonitor shows a list of students
- TA requests to filter students by a specific field and criteria
-
ClassMonitor shows a filtered list of students based on the field and criteria specified.
Use case ends.
Extensions:
-
2a. The list is empty.
-
3a. The given field does not exist.
-
3a1. ClassMonitor shows an error message.
Use case resumes at step 2.
Use case ends.
-
Use case 7: Sort list of students by a specific field
MSS:
- TA requests to list students
- ClassMonitor shows a list of students
- TA requests to sort students by a specific parameter in ascending/descending order
-
ClassMonitor shows a sorted list of students based on the field and order specified.
Use case ends.
Extensions:
-
2a. The list is empty.
-
3a. The given field does not exist.
-
3a1. ClassMonitor shows an error message.
Use case resumes at step 2.
Use case ends.
-
Non-Functional Requirements
- Should work on any mainstream OS as long as it has Java
11or above installed. - Should be able to hold up to 1000 students without a noticeable sluggishness in performance for typical usage.
- A user with above average typing speed for regular English text (i.e. not code, not system admin commands) should be able to accomplish most of the tasks faster using commands than using the mouse.
- All user operations should be completed within 100 milliseconds.
- The project must adhere to a bi-weekly iterative development schedule, ensuring continuous delivery or improvement of a working product every two weeks.
Appendix: Planned Enhancements
The following are planned enhancements that have been proposed by early testers to improve the user experience.
Team size: 5
Further validation of student details
Some of the properties of a Student can be further restricted to be more representative of their real-life counterparts.
- Currently, the
Phoneproperty is a string with unlimited length. It should have a limit of 8 to 15 characters, since some international phone numbers can go up to 15 characters.- Phone numbers in Singapore should start with
8or9.
- Phone numbers in Singapore should start with
Emailaddresses should follow the local@domain.com format.- Students should have unique contact details.
- This means that an
addoreditcommand will fail if it results in two students having the samePhonenumber and/orEmail.
- This means that an
- Student
Names should not be case-sensitive.- This means that
UniqueStudentListshould treatTan Ah Bengandtan ah bengas the same student and these two names will never exist simultaneously. - One possible implementation is to store
Nameas a lowercase string regardless of how the user enters it, e.g. enteringadd n/Tan Ah Bengwill reduce the name totan ah bengbefore adding it to the list.
- This means that
Cons: Such additional constraints may restrict the user too much if they want to use the application without hassle.
Alternative 1
- Have as toggleable ‘Strict Mode’ option that the user can enable if they want ClassMonitor to ensure that they cannot enter fields that do not fulfil the limitations.
- Otherwise, only limit fields by string length in ‘Unstrict Mode’.
Enhanced name input
- Allow for ways to input names that are not normally allowed as command parameters, specifically the
/character in ‘S/O’. - Proposed Change: Have an alternative way to input the name using
".- e.g.
add n/"A S/O B" ...will allow the user to enter a name with a/.
- e.g.
Further input validation for commands
Command inputs can be further restricted to align with the field constraints.
- The
findcommand can detect inputs that are out of range (e.g.find star > 50000will throw an error because ClassMonitor can never have more than 50000 stars).
More granular error messages
Currently, ClassMonitor uses a generic ‘try-catch’ approach to handling errors in user input and execution. This has some issues:
- Having a generic error message can confuse users as they will not know which part of the input they have entered wrongly.
- The command will throw an error message if it encounters at least one error, which would result in the user having to retry the command repeatedly if there are multiple errors.
Proposed changes
- Have the parser capture the preamble/prefix content that is causing the error and display it to the user.
- e.g.
star i/1 s/3could throw the errorinvalid index/preamble 'i/1' given..
- e.g.
- Have the command throw an error message for each option/preamble that is invalid or missing.
- e.g.
edit 1 n/s*m p/will throw an error message with the concatenation for the invalid name and missing phone number.
- e.g.
Appendix: Instructions for manual testing
Given below are instructions to test the app manually.
NOTE
These instructions only provide a starting point for testers to work on; testers are expected to do more exploratory testing.
Launch and shutdown
-
Initial launch
-
Download the jar file and copy into an empty folder
-
Double-click the jar file Expected: Shows the GUI with a set of sample contacts. The window size may not be optimum.
-
-
Saving window preferences
-
Resize the window to an optimum size. Move the window to a different location. Close the window.
-
Re-launch the app by double-clicking the jar file.
Expected: The most recent window size and location is retained.
-
-
{ more test cases … }
Deleting a student
-
Deleting a student while all students are being shown
-
Prerequisites: List all students using the
listcommand. Multiple students in the list. -
Test case:
delete 1
Expected: First contact is deleted from the list. Details of the deleted contact shown in the status message. Timestamp in the status bar is updated. -
Test case:
delete 0
Expected: No student is deleted. Error details shown in the status message. Status bar remains the same. -
Other incorrect delete commands to try:
delete,delete x,...(where x is larger than the list size)
Expected: Similar to previous.
-
-
{ more test cases … }
Saving data
-
Dealing with missing/corrupted data files
- {explain how to simulate a missing/corrupted file, and the expected behavior}
-
{ more test cases … }
Glossary
| Quick Reference | ||||
| Course | Main Success Scenario (MSS) | Mainstream OS | Teaching Assistant (TA) | Tutorial Group (TG) |
C
Course
A course with a program and syllabus. e.g. CS2030S
M
Main Success Scenario (MSS)
The Main Success Scenario (MSS) describes the most straightforward interaction for a given use case, assuming that nothing goes wrong.
Mainstream OS
Windows, Linux, Unix, MacOS
T
Teaching Assistant (TA)
A tutor attached to a class
Tutorial Group (TG)
A group of students from a particular course. e.g. G13