User Guide
Greetings Teaching Assistants (TAs)!
We are a team of 5 ex-TAs from the National University of Singapore majoring in Computer Science. We have taught classes and managed students and understand that administration can a burden. Perhaps you feel that the current student management systems are
- Tedious?
- Non-centralized?
- Overly complicated?
Well, we had the same thoughts! Which is why we decided to come together to build ClassMonitor for you. We hope that you can try out our desktop application and experience the productivity boost yourself! 😊
About ClassMonitor
ClassMonitor is a Student Management System that empowers TAs and Professors to manage their student particulars and obtain insights about their students’ performance ratings. As a TA, you can easily view and edit your students’ particulars during your daily classes. Utilize ClassMonitor’s flexible tagging system to help you organize your students according to their modules and classes. Finally, streamline your performance grading decisions by deriving insights from your students’ performance indicators across time, through ClassMonitor’s statistics – you can allocate stars to students for good class participation and bolts for absenteeism!
For a more detailed view of ClassMonitor’s features, you can refer to the Features section below! With a focus on efficiency, you can interact with ClassMonitor without ever reaching for your mouse or moving away from your keyboard! With a focus on user-friendliness, ClassMonitor is easy to learn!
This User Guide provides an in-depth documentation, so you can easily use and integrate ClassMonitor into your day-to-day classes as a Professor or TA. It covers how to launch ClassMonitor, core ClassMonitor features and commands, common terms and definitions used in ClassMonitor, and some troubleshooting recommendations. Head over to How to Use The User Guide to get started!
Table of Contents
- About ClassMonitor
- Table of Contents
- Features
- Quick start
- How to Use The User Guide
- Reference Guide
- Commands
- Student Commands
add- adds a student to ClassMonitorlist- lists all studentsedit- edits a student’s informationstar- awards for good participationbolt- records absenteeism of studentfind- finds all students by a specified fieldsort- sorts all students by a specified fielddelete- deletes a student’s particularsclear- clears all students’ particulars
- General Commands
- Student Commands
- Command summary
- Additional Information
- FAQ
- Known issues
- Acknowledgements
- Glossary
Features
ClassMonitor provides two core features:
- Student Management System
- Student Analysis Tool
Student Management System
ClassMonitor allows you to manage your classes and keep track of your student details.
- Efficiently create, view, edit and delete your students’ details.
- Sort your students by their name, phone number, email address, major, number of stars and number of bolts.
- Tag students in your current list using an efficient tagging system where you can create and edit existing tags.
- Filter your students by their name, major, tags, number of stars and number of bolts.
Student Analysis Tool
ClassMonitor collects and tracks the following data, allowing you to tailor your pedagogy for more effective teaching through statistical analysis:
- Track students’ level of participation in class.
- Record your students’ attendance.
Quick start
-
Ensure you have Java
11or above installed in your Computer. You can download it here. -
Please follow these steps to verify the version of Java installed on your system.
-
Download the latest
classmonitor.jarfrom here. -
Copy the file to the folder you want to use as the home folder for your ClassMonitor.
-
Open a command terminal. You can do this by searching for “Command Prompt” (for Windows) or “Terminal” (for Mac) in your computer’s search bar.
- In the command terminal, navigate to the folder where you placed the classmonitor.jar file. You can do this by using the “cd” command followed by the folder path. For example, if your file is in the “Downloads” folder, you would type:
cd Downloads - After navigating to the correct folder, type the following command and press Enter:
java -jar classmonitor.jarThis command launches ClassMonitor. After a few seconds, a Graphical User Interface (GUI) similar to the one shown below should appear. You’ll see some sample data in the app.
-
Type the command in the command box and press Enter to execute it. E.g. typing
helpand pressing Enter will open the help window.
Some example commands you can try:-
list: Lists all contacts. -
add n/Damith p/98765432 e/damith@uml.com m/Computer Science: Adds a student namedDamithto the list. -
edit 1 n/Damith Dalegend: Edits the name of the first person in the student list to beDamith Dalegend. -
delete 1: Deletes the 1st student shown in the current list. Use this only after you have populated your student list. -
star 1 s/3: Adds 3 stars to the first student on the list. Use this only after you have populated your student list. -
bolt 1 b/3: Adds 3 bolts to the first student on the list. Use this only after you have populated your student list. -
sort major asc: Sorts the student list based on themajorfield in ascending order. -
find name Chitra: Finds all students who have the nameChitra. -
clear: Deletes all students. Use this responsibly. -
exit: Exits ClassMonitor.
-
- Refer to the Commands section for details of each command.
How to Use The User Guide
NOTE
We highly recommend that you read through the User Guide in sequential order.
If you have not installed ClassMonitor, head over to the Quick Start section.
If you are an experienced user, you can refer to the Command Summary for a quick overview of all of ClassMonitor’s commands.
If you are stuck, refer to the section on FAQ.
TIP
This User Guide is highly navigable; simply click on any item in the Table of Contents and be directed to it! Clicking on the respective headings will bring you back to the Table of Contents, so it’s easy to jump across sections!
Admonition Boxes
Throughout this guide, you may find coloured boxes containing highlighted pieces of text. These are known as admonition boxes, or simply, admonitions. Please take note of the content within.
| Icon | Meaning |
|---|---|
 |
Something you should keep in mind. |
 |
Something you might find useful. |
 |
Something that provides information useful in that context. |
 |
Something you should be cautious about. |
 |
Something you should pay a lot of attention to. |
Reference Guide
This section covers all you should know about ClassMonitor. Of special note is the Key Definitions section, which covers essential knowledge to using ClassMonitor’s features.
Key Definitions
Student
A student in ClassMonitor represents a student in one of your classes.
The following are the fields for each student:
- Student’s Name
- Student’s Major
- Student’s Phone Number
- Student’s Email
- Student’s Stars (a measure of their class participation)
- Student’s Bolts (a measure of the classes the student was absent for)
- Student’s Tags
Students are unique by name, and this check is case-sensitive. This means that you cannot add two or more students with the same name and same case for this current version.
Tag
A Tag in ClassMonitor serves as a means to categorise students.
Each student can have multiple tags. These Tags are optional.
Feel free to add tags as you see fit to organize your students. Examples of how you may use a tag can include:
- Labelling the tutorial group of the student, e.g.
t18,t09,t6 - Labelling the course code for the class the student is in, e.g.
CS1101S,UTW1101A,HY2220 - Noting important student particulars, e.g.
Dyslexic
The tags assigned to a student can be edited and these changes would be reflected for the student immediately.
Flags
Flags are delimiters that enable ClassMonitor to distinguish different parameters without ambiguity.
| Flag | Corresponding Field |
|---|---|
| n/ | NAME |
| p/ | PHONE |
| e/ | |
| m/ | MAJOR |
| s/ | STAR |
| b/ | BOLT |
| t/ | TAG |
Commands
This section guides you through the precise execution of each command.
NOTE
-
Words in
UPPER_CASEare the parameters to be supplied by the user.
E.g. inadd n/NAME,NAMEis a parameter which can be used asadd n/John Doe. -
Items in square brackets are optional.
E.gn/NAME [t/TAG]can be used asn/John Doe t/friendor asn/John Doe. -
Items with
… after them can be used multiple times including zero times.
E.g.[t/TAG]…can be used ast/friend,t/friend t/familyetc. -
Command outputs with
[...]refers to a truncated output for brevity in the User Guide. Within the app, additional details may be displayed. -
Parameters can be in any order.
E.g. if the command specifiesn/NAME p/PHONE_NUMBER,p/PHONE_NUMBER n/NAMEis also acceptable. -
Extraneous parameters for commands that do not take in parameters (such as
help,list,exitandclear) will be ignored.
E.g. if the command specifieshelp 123, it will be interpreted ashelp. -
If you are using a PDF version of this document, be careful when copying and pasting commands that span multiple lines as space characters surrounding line-breaks may be omitted when copied over to the application.
Student Commands
add - adds a student to ClassMonitor
Format: add n/NAME p/PHONE_NUMBER e/EMAIL m/MAJOR [t/TAG]…
INFO
- Adds a new student to ClassMonitor using the provided details and sets the student’s initial star and bolt values to 0.
NOTE
NAMEmust ONLY contain alphanumeric characters and spacesPHONE_NUMBERmust ONLY consist of numbers and be at least 3 digits longEMAILmust ONLY contain alphanumeric characters and follow the format of a valid email address, which is local-part@domainMAJORmust ONLY contain alphabets and spaces- A student can have any number of tags (including 0)
WARNING
For the best user experience,
PHONE_NUMBER,MAJOR,EMAIL,TAGshould be limited to 50 characters or fewerNAMEshould be limited to 30 characters or fewer
to ensure that all fields are fully visible on the screen without being cut off or truncated.
Please also avoid specifying any additional flags besides the ones specified in the command format.
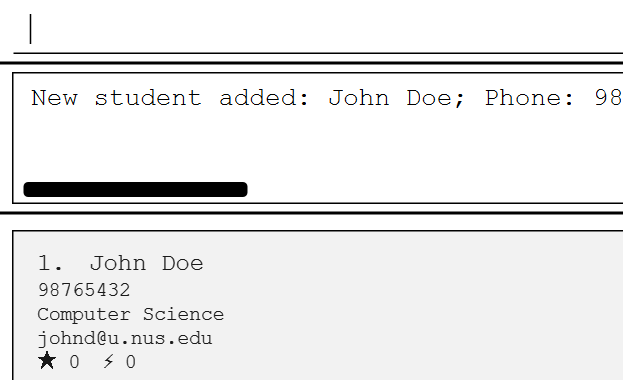
Example:
Command Input Box:
add n/John Doe p/98765432 e/johnd@u.nus.edu m/Computer Science
Assumption:
- A student by the name of
John Doe(case-sensitive) does not already exist.
list - lists all students
Format: list
INFO
- Displays all students, clearing existing filters on the student list.
edit - edits a student’s information
Format: edit INDEX [n/NAME] [p/PHONE_NUMBER] [e/EMAIL] [m/MAJOR] [s/STAR] [b/BOLT] [t/TAG]…
INFO
- Edits the student at the specified
INDEX. The index refers to the index number shown in the displayed student list. - At least one of the optional fields must be provided.
- Existing values will be updated to the input values.
NOTE
INDEXmust be a positive integer (e.g. 1, 2, 3, …) NAMEmust ONLY contain alphanumeric characters and spacesPHONE_NUMBERmust ONLY consist of numbers and be at least 3 digits longEMAILmust ONLY contain alphanumeric characters and follow the format of a valid email address, which is local-part@domainMAJORmust ONLY contain alphabets and spacesSTAR/BOLTmust be an integer between 0 and 50,000 (e.g. 0, 1, 2, …, 50,000)
TIP
- When editing tags, the existing tags of the student will be removed i.e adding of tags is not cumulative.
- You can remove all the student’s tags by typing
t/without specifying any tags after it. - Editing the number of stars/bolts of a student replaces the existing value.
Examples:
edit 1 p/98765432 e/johndoe@u.nus.eduEdits the phone number and email address of the 1st student to be98765432andjohndoe@u.nus.edurespectively.edit 2 n/Betsy Crower t/Edits the name of the 2nd student to beBetsy Crowerand clears all existing tags.edit 3 s/0 b/0Edits both the total number of stars and the total number of bolts received by the 3rd student to be0.
star - awards for good participation
Format: star INDEX s/STAR
INFO
- Edits the student at the specified
INDEX. The index refers to the index number shown in the displayed student list. STARrefers to the number of stars to be awarded to the student.
NOTE
INDEXmust be a positive integer (e.g. 1, 2, 3, …)STARmust be a positive integer between 1 and 10 (e.g. 1, 2, …, 10)- The specified number of stars will be added to the student’s current star count.
- A student can only accumulate a maximum of 50,000 stars and a minimum of 0 stars.
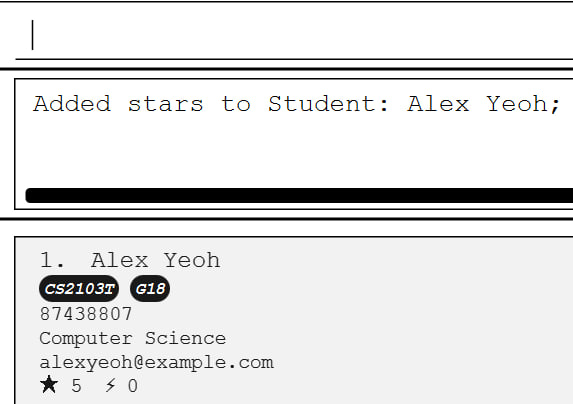
Example:
Command Input Box:
star 1 s/5
Assumption:
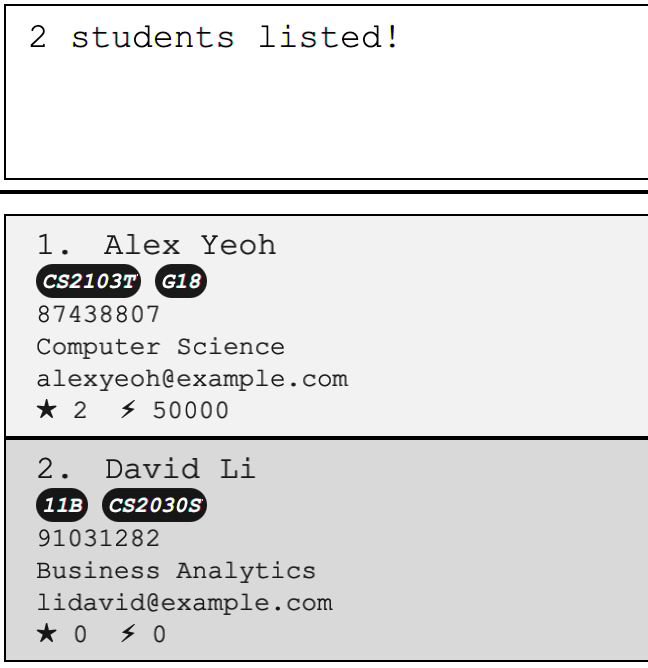
- Alex Yeoh is the student at index 1
- He currently has 0 stars
bolt - records absenteeism of student
Format: bolt INDEX b/BOLT
INFO
- The number of bolts corresponds to the number of times the student is absent.
- Edits the student at the specified
INDEX. The index refers to the index number shown in the displayed student list. BOLTrefers to the number of bolts to be awarded to the student.
NOTE
INDEXmust be a positive integer (e.g. 1, 2, 3, …) BOLTmust be a positive integer between 1 and 10 (e.g. 1, 2, …, 10) - The specified number of bolts will be added to the student’s current bolt count.
- A student can only accumulate a maximum of 50,000 bolts and a minimum of 0 bolts.
Example:
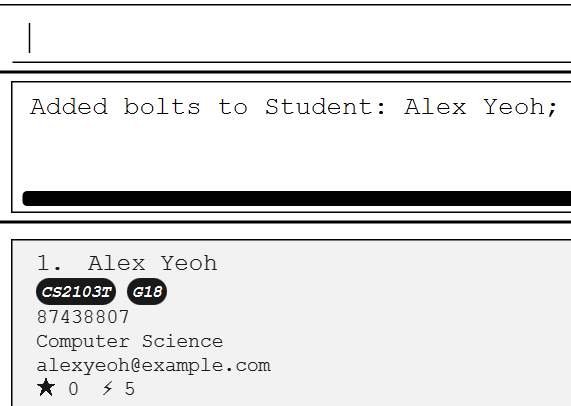
Command Input Box:
bolt 1 b/5
Assumption:
- Alex Yeoh is the student at index 1
- He currently has 0 bolts
find - finds all students by a specified field
Format: find FIELD CRITERIA
NOTE
Accepted fields are name, major, star, bolt, and tag.
The parameters for CRITERIA depend on the FIELD specified.
| Field | Criteria | Format, Examples |
|---|---|---|
| name | KEYWORD [MORE_KEYWORDS]… | find name KEYWORD [MORE_KEYWORDS]… e.g. find name Alex David |
| major | SUBSTRING | find major SUBSTRING e.g. find major Science |
| star | OPERATOR NUMBER | find star OPERATOR NUMBER e.g. find star = 0 |
| bolt | OPERATOR NUMBER | find bolt OPERATOR NUMBER e.g. find bolt > 5 |
| tag | SUBSTRING | find tag SUBSTRING e.g. find tag CS2103T |
INFO
find name: Finds students with names that match any of the given keywords.- The order of the keywords does not matter. E.g.
Hans Bowill matchBo Hans. - Only full words will be matched. E.g.
Hanwill not matchHans. - Students matching at least one keyword will be returned (i.e. OR search).
- The order of the keywords does not matter. E.g.
find major/find tag: Finds students with majors/tags that contain the given keyword.find major Sciencewill return students withComputer Sciencemajors andSciencemajors.find tag CSwill return students withCS2103Ttags andCS2100tags.
find star/find bolt: Finds students with stars/bolts within the bounds as specified by the given operator and number.- Accepted operators are:
- < (strictly less than)
- <= (less than or equal to)
- > (strictly more than)
- >= (more than or equal to)
- = (equal to)
- Accepted numbers are integers in range [0, 2147483647].
- Accepted operators are:
Example:
Command Input Box:
find name alex david
Assumption:
- Alex Yeoh is the only student whose name includes a word that matches
alex. - David Li is the only student whose name includes a word that matches
david.
TIP
Use the list command to view all students again.
sort - sorts all students by a specified field
Format: sort FIELD ORDER
INFO
- Accepted fields are
name,phone,email,major,star,bolt. - Accepted orders are
ascfor ascending order of the specific fielddescfor descending order of the specific field
nameandemailare sorted in lexicographical order whilephone,star, andboltare sorted in numeric order.- The field and order can have combinations of capital and lower case letters.
E.g.sort star asc,sort name AScandsort Major descare valid. - For tie breaking between students that have the same value for a given field, name will be used as a tiebreaker.
Example:
Command Input Box:
sort star desc
Assumption:
- Your current student lists consists of only 3 students, Alex Yeoh, Bernice Yu, and David Li.
- Alex Yeoh has 3 stars
- Bernice Yu has 2 stars
- David Li has 1 star

delete - deletes a student’s particulars
Format: delete INDEX
- Deletes the student at the specified
INDEX. - The index refers to the index number shown in the displayed students list.
- The index must be a positive integer 1, 2, 3, …
Examples:
delete 2deletes the 2nd student in the displayed list.find name Alexfollowed bydelete 1deletes the 1st student in the results of thefindcommand.
clear - clears all students’ particulars
Format: clear
WARNING
This is NOT an undo-able process. Once you clear ClassMonitor, your data will be lost. So be careful and only use this once the semester is over and the previous semester’s student data is no longer needed.
General Commands
help - view user guide for help
Format: help
INFO
Shows a pop-up message like below explaining how to access the help page.

exit - exits ClassMonitor
Format: exit
TIP
You can also close the program by using the x circle at the top left of the application’s GUI.
Command summary
| Action | Format, Examples |
|---|---|
| Add | add n/NAME p/PHONE_NUMBER e/EMAIL m/MAJOR [t/TAG]… E.g., add n/James Ho p/83482048 e/jamesho@u.nus.edu m/Computer Science t/CS2103T t/G18 |
| Clear | clear |
| Delete | delete INDEXE.g., delete 3 |
| Edit | edit INDEX [n/NAME] [p/PHONE_NUMBER] [e/EMAIL] [m/MAJOR] [s/STAR] [b/BOLT] [t/TAG]…E.g., edit 2 n/James Lee e/jameslee@u.nus.edu m/Psychology |
| Star | star INDEX s/STAR E.g., star 1 s/5 |
| Bolt | bolt INDEX b/BOLT E.g., bolt 1 b/5 |
| Find | find FIELD CRITERIAE.g., find name alex david |
| Sort | sort FIELD ORDERE.g., sort star asc |
| List | list |
| Help | help |
| Exit | exit |
Additional Information
Saving the data
ClassMonitor data are saved in the hard disk automatically after any command that changes the data. There is no need to save manually.
Editing the data file
ClassMonitor data are saved automatically as a JSON file [JAR file location]/data/classmonitor.json. Advanced users are welcome to update data directly by editing that data file.
DANGER
If your changes to the data file makes its format invalid, ClassMonitor will discard all data and start with an empty data file at the next run. Hence, it is recommended to save a backup of the file before editing it.
Furthermore, certain edits can cause the ClassMonitor to behave in unexpected ways (e.g. if a value entered is outside of the acceptable range). Therefore, edit the data file only if you are confident that you can update it correctly.
Archiving data files [coming in v2.0]
Details coming soon …
FAQ
Q: How do I transfer my data to another Computer?
A: First, install the app on the other computer. Then, replace the empty data file it creates with the file containing your data from the previous ClassMonitor home folder.
Q: How do I deduct stars from a student?
A: Currently, direct deduction of stars is not possible. However, you can achieve this by using the edit command temporarily. First, find the index of the student (INDEX). Next, determine the student’s updated star count (STAR). Finally, use the command edit INDEX s/STAR to ‘reduce’ the student’s star count.
Known issues
- When using multiple screens, if you move the application to a secondary screen, and later switch to using only the primary screen, the GUI will open off-screen. The remedy is to delete the
preferences.jsonfile created by the application before running the application again.
Acknowledgements
ClassMonitor is a brownfield software project based off AddressBook Level-3, taken under the CS2103T Software Engineering module held by the School of Computing at the National University of Singapore.
Java dependencies:
Documentation dependencies:
Fonts used in ClassMonitor:
- ClassMonitor Website:
- Epilogue by Tyler Finck
- Source Code Pro by Paul D. Hunt
Other acknowledgments:
- Material Design Icons:
- star by Sketchify on Canva as ClassMonitor’s App Icon
- Font Awesome 6 icons:
- book as the “note” admonition icon
- circle-info as the “info” admonition icon
- fire-flame-curved as the “danger” admonition icon
- lightbulb as the “tip” admonition icon
- triangle-exclamation as the “warning” admonition icon
- Code acknowledgements:
- Website Layout adapted from AY2223S1-CS2103T-W16-2’s tP Project
- Custom link fragment checker adapted from the World Wide Web Consortium
- Pure CSS auto-incrementing heading counters adapted from @gvgramazio on StackOverflow
- PDF styling of HTML pages following Michael Perrin’s tutorial
- Pure liquid admonitions adapted from @kimkyunghwan21 on GitHub
- Pure liquid HTML table-of-contents from @allejo on GitHub
- Miscellaneous:
- Docusaurus for admonition colors and styling
- SchemeColor for admonition colors
Glossary
| Quick Reference | |||
| Admonitions | Graphical User Interface | Case-Sensitive | local-part@domain |
A
Admonitions
Colored boxes that feature highlighted text segments.
G
Graphical User Interface
A visual interface that uses pictures, menus, and a mouse (for clicking icons or using menus) to interact with a system.
C
Case-Sensitive
In a case-sensitive system, “A” is considered distinct from “a”, meaning they are treated as separate characters. This contrasts with a case-insensitive system, where uppercase and lowercase letters are treated as the same character.
l
local-part@domain
The local-part@domain format specifies the following constraints for email addresses:
- The local-part should only contain alphanumeric characters and these special characters, excluding the parentheses, (+_.-). The local-part may not start or end with any special characters.
- This local-part is followed by a ‘@’ and then a domain name. The domain name is made up of domain labels separated by periods.
The domain name must:
- end with a domain label at least 2 characters long
- have each domain label start and end with alphanumeric characters
- have each domain label consist of alphanumeric characters, separated only by hyphens, if any.